
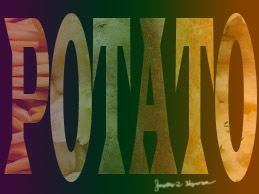
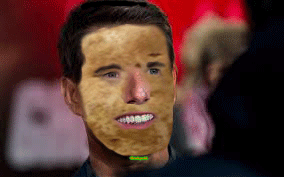
Portfolio #1: P-P-P-POTATO
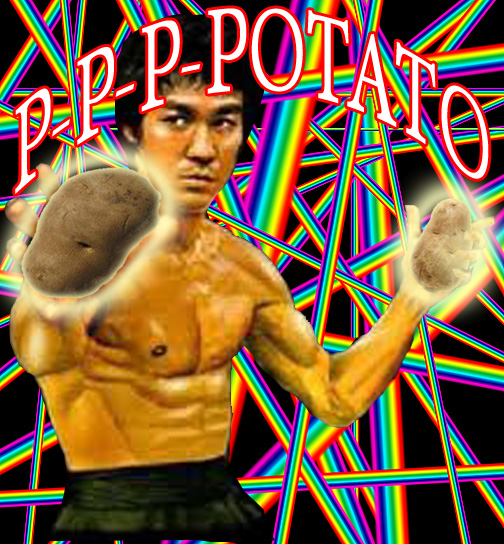
For this project, I got a picture of two separate potatoes for diversity, and a picture of Bruce Lee, a famous martial artist/actor. First, I opened up all of the images and made them roughly the same size by changing their image size in the Image tab. I made them about 7 inches big. Then, I used the pen tool to cut out Bruce Lee from his background, made it a selection, and Ctrl J'd it into a new layer. I used the eraser tool to clean up the edges of his body. Then, I got rid of the white around the potatoes using the magic wand tool and changing the tolerance depending on what I needed done. After doing that I Ctrl T'd the potatoes to make them smaller to fit into Bruce Lee's hand and rotated them using the rotate tool in the Edit<Transform menu. I rotated them and sized them to fit into his hands, one potato going into each hand. After doing so, I went into the layer style of the potato and gave it a normal outer glow, and a very light inner glow to give it an angelic/powerful look. I made the background black, and created a new layer on top of it. I get the rainbow gradient with empty space on the end and started randomly clicking and dragging my mouse until I had rainbow, on top of rainbow, on top of rainbow, on top of rainbow. Lastly, I created a text box on top of all the other layers and wrote P-P-P-POTATO in it. I gave it a red stroke and arched the text over Bruce Lee's head. Finally, you get a masterpiece.
Portfolio #2: Mission Impotatoble
| tom-cruise-porfolio-2.gif |
For this image, one must first find an image of Tom Cruise and a potato. After doing so, open both images, make them smaller window, and drag the potato background into the Tom Cruise photo. Now that you have that completed, use the lasso tool cut out all of Tom Cruises facial features. Let's say you have one eye selected, now Ctrl J it into a new layer and name that layer Left/Right Eye. After you do this with all the facial features, hide the layer with Tom Cruise on it and un-hide the potato layer. Move the potato into the showing facial features and Ctrl T to re-size the potato to fit his face. You might also need to warp the potato to make it look fancy. Now that you have finished this, take the eraser and go around the face features to smooth them up. Make sure you erase some of the potato to make it look like a chin. Once finished, use the smudge tool and blend the edges of his face onto the potato. Last couple of things are un-hide the Tom Cruise layer, and use the burn tool to make his neck a little darker to kinda blend in with the potato, make sure the shadow of the potato is darker than the rest of his neck so it's still a shadow and burn his face features to blend in. And lastly, make a text layer, write Mission Impotatoble, make it orange, put a stroke and out blow on it, and move it to the bottom of your screen.
Portfolio #3: The Name's Bond, Potato Bond
| potatogif.gif |
This is my potato gif. It shows a James Bondish kind of weirdish sketchy thing. Grammar is efficient. I got a typical picture of a potato. I used the magnetic lasso to get the potato out and Ctrl J'd it into a new layer. Then, I copied that about 60,000,000 times and put all the layers into a folder called "potatoes". Then, I made a new folder above the potato folder and named it "Black Layer Stuff". I then put a new layer into the folder, Ctrl Backspaced the background black, and copied it about 60,000,000 times. I hid the Black Layer Stuff folder and selected the potatoes. As I the first potato layer at the bottom of the folder, I left the potato there, then I selected the next layer up and moved the potato a little to the left, then the next layer a little more to the left, etc. Do this until you get the the bottom left corner, and leave the remaining five or six potato layers at that corner. Then, I selected the bottom black layer tool that corresponds with the first potato layer and I erased a hole in it with the potato directly in the center. As you go up the black layers, un-hide the potato layer that corresponds with the black layer you are on and erase a hole in the layer around the enter of the potato. Now, when you get to the last one. Slowly make the eraser smaller. When you get to an eraser size that the potato sticks out of the hole, erase the corresponding potato layer so that you only see the potato that's in the hole. So this until it disappears. Now, YOU HAVE ALL THE LAYERS. Open up the animation window, and for the first frame, un-hide the first potato and black layer. Then, as you progress through the gif, hide all the other layers except for the ones that correspond with each other. Set them all at .1 seconds and you have yourself a freakin awesome gif.
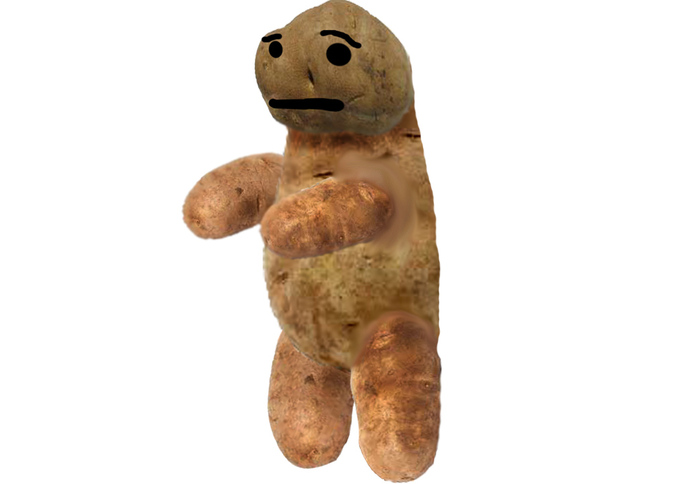
This is George. George is a combination of six different potatoes. First, you must open three different photos, two with one potato (but different potatoes), and one with two potatoes. Take the more elongated potato, use the magnetic lasso tool to cut the potato out of the image, and drag it over into the 10 x 8 new document. Do this with the other two potato photos, but copy two of the two-potato image to the 10 x 8 document. Now, hide the potato photos except the slightly more elongated one that you chose. Use Ctrl T to re-size it to a about half-an-inch away from the top and bottom of the canvas. Next, take the other single potato photo, un-hide it, and size it to fit proportionally on the body-potato (this will now be referred to as the body). Use the burn tool on the body right underneath the head head to give it a bit of a shadow feel. Finally, smudge the head just a little, so it looks to be blended into the body. Now, take one of the two two-potato photos. These are going to be the arms. Use Ctrl T to re-size the potatoes to fit proportionally to the body. Make sure this layer is on top of the body layer. Once you have these placed appropriately on the body, use the eraser tool and erase the left arm where it goes over the body to make it look like it goes behind the body and you can't see it. Now, burn the arms a little to match the body potato better. Finally, merge the body and arms layers together and smudge them a little. I smudged too much and it made it look too blurry. Don't do that. For the last body part, take the last two-potato image. These are going to be the legs. Ctrl T them to re-size and rotate them to be upright and proportional to the body. This image should also be above the body and do to it the same as you did to the arms. Burn a little, erase the back leg a little, merge them, and smudge a little. The last thing you need to do is make a new layer, and draw a really sketchy face on the head. The sketchiness of this face adds to the overall theme of the piece. Use the perspective tool (can be found in Edit<Transform) to make it match the way the head goes back a little. This just makes him look normal and not like a freak...although he is a man made out of potatoes...
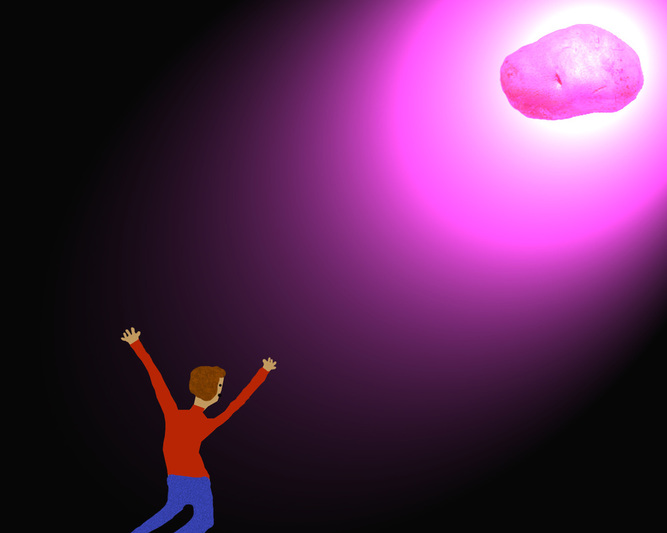
For my fifth portfolio project, I decided to have an individual, probably the head of a cult, to be bowing down to Lord Potato as he ascends down to Earth in a pink haze. First, find a picture of a potato, open it, and use the magnetic lasso to cut it out of the white background. Then, move it into a new 10 x 8 document. Re-size the potato to fit snugly in a upper corner of the project. Next, go to lighting effects (Filters<Render) and set the settings to this: Intensity at 100, Focus at -57, Gloss at -21, Material at -64, Exposure at 71, and Ambience. Set the top color selection to a nice magenta. Be sure you make the background on the potato layer white before you do this. Move the lighting to just on the potato. Next, make a new layer, and use the pen tool to make the shape of a man on his knees. Fill this work path with a skin toneish color. Next, create a new layer and use the pen tool to outline the man's legs up to his waist. Fill this path blue and add some noise to give it a jean look. Now, make another layer and outline it with the pen where his shirt would be and fill this red. Put this shirt layer under the pants layer and color the areas in to make it look smoother. Now, delete the hands that come out of the sleeves and draw in some hands. Finally, the face. Make a new layer and use the pen to outline what would be a typical hairline. fill this in brownish and use a filter to add to the hair feel. Lastly, make a new layer and draw in a mouth and eyes.
#6 Angry Potato
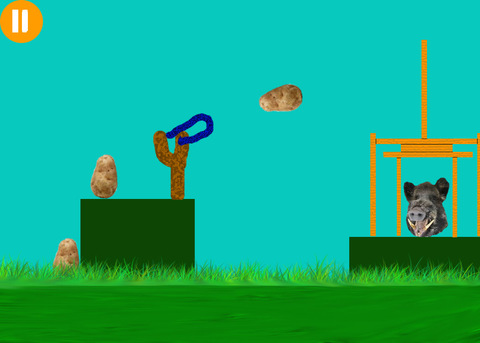
First, get a picture of a potato and use the magnetic lasso to get the potato out of the picture and drag three of them into a 7x5 new document. Then, search a wild boar because they are the natural predator of potatoes, and do the same with him but only drag one over. Next, use the square marquee tool and select the bottom 1/6th of the screen and fill in in with green and apply a filter of your choice to make it look like ground. Then get the grass brush and have two different shades of green in your foreground and background colors and apply the grass all over the top of the ground.Use the smudge tool to join the two object. Then, make a new layer and use the box marquee tool to make two squares and color these in the same color. Now, make a new layer and use the box marquee tool to make a thin long box and color this in with a yellowish orangeish color and apply a wood-like filter. Copy this seven times and arrange them however you want using the transform tool to make a structure on the second green box. Now, on the other green box, put one potato in mid-air, one on top near the back edge of the box and one on the ground. Make sure these are behind the grass. Then, on a new layer, use the paintbrush to draw a sling shot and apply a different wood-like filter. Make a new layer and make the rope that shoots the potato. Make sure it looks like it just shot the potato. Finally, make a new layer behind all the other layers, color it blue. Now you have made a popular game. Sell it on the app store and make millions of dollars.
#7 Seeing through the Letters of Potato
For this photo, find five different forms of a potato and open a picture of them. I chose mashed potatoes, french fries, a normal potato, a sweet potato, and chips. Use the magnetic lasso to cut out all of the pictures from their white background. Drag all of these onto a 7x5 document. Make a word layer on top of all of those layers and write POTATO. Now, make the background black and fit all of the different potato images to one letter. French fries fit onto "p", chips onto "o", etc. Once completed, and it will take quite a while, merge all of the layers together except for the black background. Now, move the word layer below the potato-object layer. Then, right click the potato-object layer and click create clipping mask. Finally, make a new layer on top and put the opacity to about 50% and use a rainbow/multi-color gradient and spread it across the word to add "flavor."
#8 Wheel of Potato
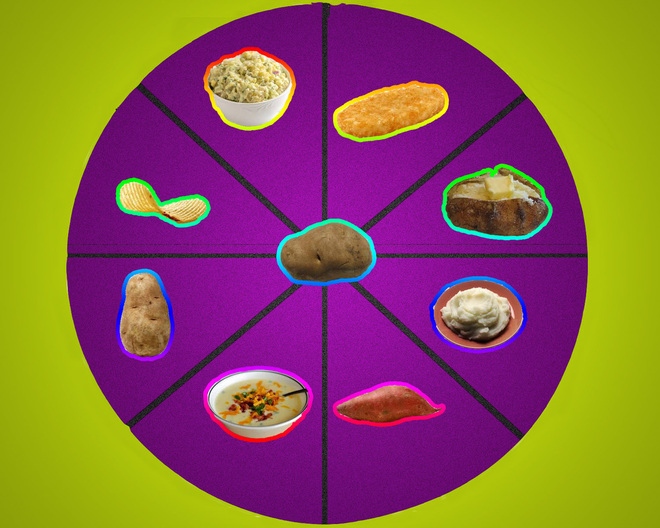
On this project, I first gathered nine different forms of potatoes and used the magnetic lasso to cut them out of their surrounding. Then, I dragged one of each into a 7x5 document. Make a new layer and put it above the background layer. Use the circle marquee tool to make a circle and Ctrl Backspace it purple. Add some noise to purple background. Next, make a new layer and use the rectangular marquee tool to make a thin selection down the middle of the circle. Color this in black and Ctrl J it three times. Ctrl T each of the new layers so they equally divide the circle into about even section. Next, move the potato-forms onto the even sections and then merge all of the potato form layers. Go to layer style and add a rainbow gradient stroke to the layer. Now, color the background in yellow and merge the circle layer with the black lines onto the background. Apply a lighting effects filter with the Omni type selected at these numbers: Intensity 17, Gloss 7, Material 10, Exposure 10, Ambience 10. Now, use the clone stamp tool to fill in or fix anything you made a mistake on and vwalah, you have a wheel of potatoes.
#9 Mr. Parker Loves Potatoes
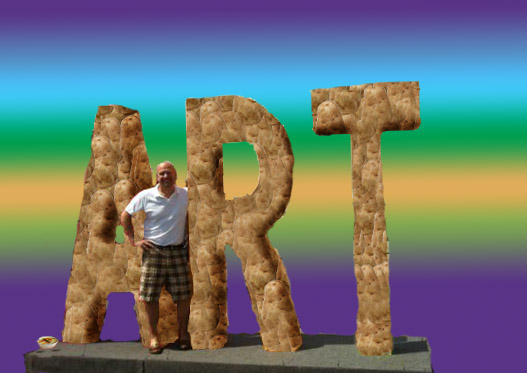
First, get this photo of Mr. Parker off of his website. Then, make a new document and get a picture of a potato (already magnetic lassoed and everything) and make a whole bunch of them and fill the document. You may use the clone stamp tool after a while. Next, go to Edit>Define Pattern and turn this potato masterpiece into a pattern. Then, use the magnetic lasso to select the A and copy it onto a new layer. Go to the layer and Shift F5 and fill it with your new potato pattern. Do this with all the letters. Now, go back and use the clone stamp tool to clean it up. Next, find a picture of potato soup and cut it out of its background. Drag it into the picture and put it over the water bottle in the original photo. Now, use the perspective tool to make it look normal. Now, use the magnetic lasso to cut out your new Mr. Parker Loves Potatoes picture from its background and CTRL J is into a new layer. Delete the background and make a new layer below your layer. Now apply a gradient of your choice and Mr. Parker's respect is your.
#10 The Spinning Potato
For this project, first, get a picture of a potato and lasso it out. Now, make a lot of copies of that layer. Then, use the magnetic lasso to select the potato on the first layer and then right click and select make work path. Now, go to the Paths tab and click on the work path you just made. The path should now show up. Get the pen tool, right click in the path and select make a selection. After that, get the gradient tool and make sure it is on the radial option and select any color you wish except it has to fade into white. Now, use Ctrl ' to bring up the grid and use one point in the middle of the potato to be the center point of your gradient. Now, just draw the gradient line from the center point to the end of the potato directly up. Then, on the next layer, do the same thing, but about 15 degrees different. Do this on all the other layers until you have made a complete circle. If you ever run out of layers, go to the paths tab and do the same thing to make the selection. Once that is finished, go to Window>Animation and make a new frame on it. Hide all the layers except the first one. Then, make a new frame with the first and second layers, etc. Once you have all the layers done, it should flow smoothly except for a little bit of normal potato you can still see. To solve that, make a new layer below all the other layers (it is already in all the frames) and use the eyedropper tool to make the background the same color as the potato.
